Welcome

Welcome All! I'm a dreamer, I hope you are too! A Posse ad Esse, or From possibility to reality, is a general state of mind. I hope you'll share your possibilities with me as I will with you. Namaste~

March 31, 2011

Union Station Fermentation


After our aforementioned cheese class, A~ and I went down town, Ogden that is, to check out a new store that we had just learned about, the Union Station Fermentation store. While there, we had an opportunity to speak with one of the owners, Nigel; a very cool guy. You may remember back some time when I had my little Mr. Beer home brewing experiment. I was very happy with those results and have decided that this year I will be stepping up my home brewing game to include using fresh hops (Which we'll also be trying to grow in the garden this year as well.), partial mash and really trying to get some good brew going... but I digress. I, along with everyone else in the "north counties", needed to either drive to Richmond (1hr north) or Salt Lake City (1/2 hr south) in order to get their beer making supplies; but no more. Here's the other great thing, they don't just supply products for home beer and wine making, they also have kits and equipment for the home cheese maker. In fact, that's how we learned about them in the first place, through our cheese making class instructor. They carry cheese molds, cultures, wax and other such cheese making stuff. This will come in handy at some point this year when we try to make some actual hard cheese. This weekend however, I'll get to participate in another of their offerings... classes. I'm scheduled to attend a class there on Saturday to learn about making mead. Yep, you heard that right, the ancient honey based liqueur of the Celts and my own personal ancestors... the Vikings! This will be information that I'll add to my knowledge base to keep for future use when we finally put our plans into action to keep bees. They also offer classes periodically on cheese making and both beginning and advanced beer making. I intend to do as many of them as I can. The long and short of it is that the Fermentation Station seems to be the kind of place that we'll be spending a lot of time at in the foreseeable future. If you're in the Northern Utah area and are at all interested in any of the things I've talked about here give them a check out. Here's their contact information:
Union Station Fermentation 274 25th St Ogden, UT 84401 (801) 392-9772

March 30, 2011

Cheese making at home

A~ and I took an opportunity to attend a cheese making class the weekend before last and had a great time. If you're following me on Facebook you may remember me posting something about it. (If you're not, don't delay, I'm making an effort to get more regular posts up there in a timely manner.) Well we had a great time.
Demonstrating the process of making mozzarella

The class was being taught by a man that started one of our very favorite local cheese companies, Beehive Cheese, and was covering the obvious first timer cheese of choice, mozzarella. This was perfectly fine with us since, with summer knocking on the door, we wanted to get a few tricks as to how to make this family favorite so we could add it to our repertoire to enjoy with fresh garden tomatoes this year. The class covered the basics of course, but we did manage to learn a couple of good tricks too. For instance, did you know that even just a couple of drops of milk in normal tap water is enough to negate the effects of the chlorine in it? That's nice to know. Another good tip was to mix your citric acid into a 1/4 cup of water (with a drop of milk in it...) to dissolve it before adding it to the milk. You should also do the same thing for your rennet. The reason for this is to allow the ingredient to be introduced to the milk more gently so to speak. Rather than the shock of a direct hit of citric acid, you can ease it into the milk this way.
Prepping all ingredients. Milk & diluted citric acid and rennet.

Since we were newly educated and wanted to put our new info to use to really reinforce it into out minds we went ahead and made ourselves a batch of fresh mozzarella and ricotta this weekend. We learned a couple of things during this process. 1. If we're going to be making cheese, even just the basic mozzarella and ricotta, we need to get some specific equipment. Namely a large fine meshed strainer and some good quality cheese cloth. (The kind for actually making cheese with, not the flimsy crap from the mega-mart.) 2. The final step in making the mozzarella is to heat the curd and "knead" it until it turns to the silken texture and stiff dough-like consistency of good mozzarella.During this part of the process, there is a time to stop when the cheese has formed... I passed that point slightly and the dough was a little on the rubbery side but still very tasty. I'll chalk this error up to simple inexperience. Overall, I really enjoyed the class and the cheese that we made as a testament to having learned something at it. now I'm looking forward to the lasagna that we'll be having with our fresh cheese! Here's a few pictures of our home cheese making process in the works. Buon appetito!!
First, heat milk slowly to 55 deg... then add citric acid and stir...

Continue heating to 88 deg (F) then add rennet..stirring in.. then let sit while curd forms and increase temp to 98

strain off the whey leaving only curds...

heat curd, continue pouring off whey and knead till silken and dough like...

Separate into serving sizes if you'd like and store in fridge. (or eat right away)


We also made ricotta from another half gallon of milk. The steps are even easier:
Heat milk in a microwave safe bowl until it reaches between 190 - 200 Deg (F), then stir in 1/4 cup vinegar per qt of Milk. This will separate the curds off almost immediately.

After lettin the curd separate for 20-30 minutes, strain off whey and store the ricotta.. BAM! that easy.

The leftover whey from both processes is still a very high nutrient supplement. If you have chickens or livestock they will love it! Waste not want not.


Till Next Time.

March 23, 2011

good times

I love walking with my sweetheart on beautiful spring evenings...

Amidst all the work we have to do at this time of year, don't forget to stop and enjoy the season!
Published with Blogger-droid v1.6.7

March 22, 2011

Building the soil in a (sub)Urban Garden I

When we moved into our current home, nearly seven years ago, the soil we had been dealt was only soil in the very loosest sense of the word. Because we knew we wanted to have a garden, we built raised beds and essentially created good soil right in place. It worked well, and we have been able to use those garden beds for the last six garden seasons with good results.Here's a picture taken during our second spring...

The other thing that we did, while using those beds, was to add copious amounts of organic matter to our soil.every year we mulched the walkways and added manure to the garden beds.in the fall we made sure to add lots of grass clippings, leaves and other available forms of compostable materials to the beds which was then turned into the soil the following spring. This had the effect of, over time, building the soil around our raised beds into pretty good soil as well. In fact, each spring when we've been cleaning out the garden and preparing for the next season, we've been forced to make time to lift our raised bed garden frames to make sure they were still sitting on the surface of our garden paths. If we hadn't done this they would have been buried a couple of years back and the soil inside them would have come over the edges... and I'm not exaggerating.
If you look close at this picture from a couple of years later you can see how the 6" deep garden frames have been buried down to only a couple of inches.

Michael Pollen, in his book _The Omnivores' Dilemma_, mentioned a phenomenon called "uppening" of the soil. I can scarcely think of a better way to describe what's been happening in the garden for these last 6 years. Not only has the soil in our garden become slowly more fertile and friable in our north garden, but the soil has literally gotten taller! Take a look back at that first picture above, see the bottom fence panel? The garden mulch is at about the same level at the bottom of that panel. Then take look at the second picture... notice how the garden level is creeping up the fence panel?

This year, we decided to take advantage of that fertile, friable soil that we've been slowly building in this part of our yard by actually removing the garden bed frames all together and tilling up the whole area.
removing the garden bed frames and getting ready to till in mulched area.

While doing this, we’ll be able to expand our garden area while also increasing the rooting depth of the plants that we grow, something that in our arid climate is a great help to their success. We'll be able do increase the rooting depth because after we double dig and run our cultivator over the garden we will also mound up the soil into loosely formed raised furrows. (I'll have to show that in a later post.)
Digging in fence guards to keep the "uppened" soil in our garden.

After double digging the garden beds, we dug a trench along our fence line and placed 3/4 inch thick 18" wide plywood sheeting between the fence posts to act as a soil barrier because last year our soil ended up actually pushing the fencing in and bowing it. Can't have that.
After cultivating and before mounding the furrows.

By this point we were ready to form up furrows, get ready for spring planting and get on to the other beds.

I've learned through the process of watching our garden evolve, that things in the garden take time. There are seasons not just throughout the year, but also throughout the gardens life cycle. This soil was once "unusable" and it now beginning to become fertile, and healthy soil. I wonder how it will be in a couple of more years...?
How are things going in your garden? Have you had to overcome poor soil conditions. What did you do to improve it organically?
P~

March 4, 2011

Morning has broken

Take a moment to look around you at the beauty of every day. The majesty of a beautiful mountain morning can hold you over through the rest of the day.
Best to you all
P~
Published with Blogger-droid v1.6.7

March 1, 2011

Collecting Globe Artichoke Seeds

I made an interesting observation this weekend past, let me take a minute to share it with you.

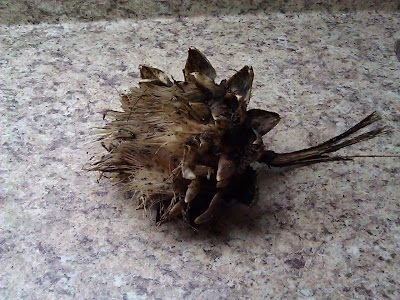
Last year we grew globe artichokes in our backyard garden and they were a great success. The plants that we grew were holdovers from the year prior which had been purchased at a local greenhouse. At the end of last season I decided to leave a couple of the artichokes blossoms to complete their life-cycle. mostly just because my wife and I love the electric blue punk rock looking spiked flower that develops.Those flowers eventually grew dry and brittle and died off as the rest of the plant went dormant for the winter. This weekend I cleaned up that garden bed and collected those last blossoms.
I imagined that, based on the shape and appearance of the final blossom, the spiky pieces (the choke) of the flower head that had dried might contain the tiny seeds of new artichoke plants; similar to a dandelion. I was partially right.
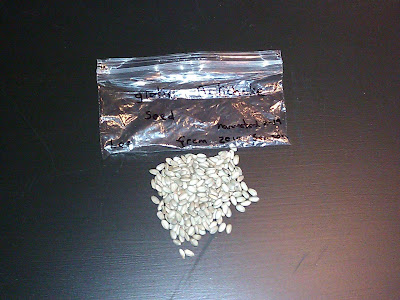
As I peeled back the layers of dried petals and choke, hoping to find small seeds connected to the ends of the choke strands, I did... sort of. What I found much to my surprise were actual seeds, and not even the dainty little dandelionesque seeds I had expected, but sunflower seed sized real seeds tucked right in there amidst the choke. Who knew? Well I assume someone did, but not I. The garden never ceases to amaze me. Just letting Mother nature do her thing so often results in little wonders.

So now what? Will they grow? I would assume that they will, and you know I will certainly try, but I don't know if they will produce true to type. It will definitely be a fun experiment to watch though. I'll make sure to keep you informed.
Have any of you ever grown artichokes from seed? Ever grown them from seed that you kept from your own plants? I'm always open to learn from your experiences.
Till next time...
P~